Thursday, March 17, 2022

Pinkfresh "Frame It Up" Challenge

My first entry this month for Pinkfresh Studio’s “Frame It Up” challenge. They’ve also included a colour inspiration of yellow, peach, pink and turquoise and that did challenge me because I so often go right to greens for leaf colours. I’ll be trying this again!


I black embossed the “Miss Your Smile” flower stamp and popped up the “You are the Best” sentiment from “Fancy Script Words” with 4 layers of black cardstock to give it that extra height.

I thought I would try something new so I hot foiled PF’s “Small Butterflies” on heat resistant acetate. OH MY GOSH I LOVE THIS!! For my finishing touches I splattered on some ink colour and added some “Stargazer” jewels. 💕

Thanks for stopping by!

Friday, October 22, 2021

Full Front Card Shaker Tutorial

TUTORIAL TIME!!   

Today I'm sharing a tutorial on how to do a fully covered shaker card paired with an image from the latest digi collection "Spellbinding Witches."


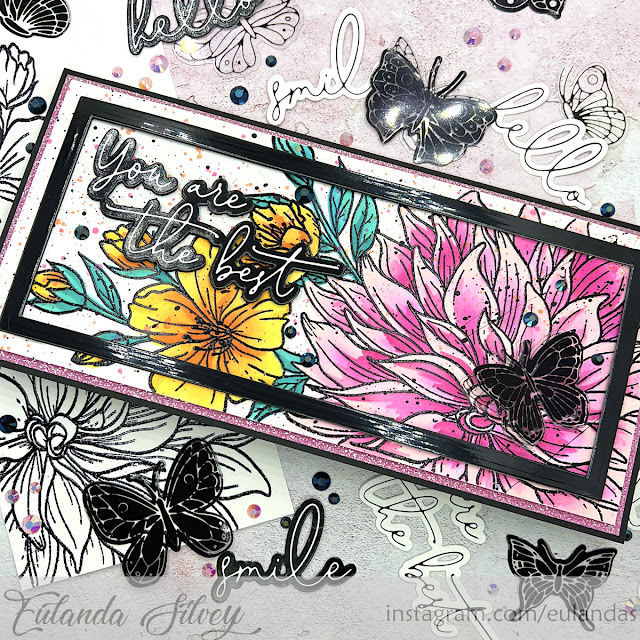
I started by creating my background using Tim Holtz twisted citron, mowed lawn and black soot distress oxide ink.  Then I did a bunch of splatters with white and black thinned out gesso and liquid glitter. I added another layer used PD's "Creepy Tree" stencil but instead of the oxide I used the regular TH black soot for a darker black and also distressed the edges slightly with it.  

To start your fully covered shaker, cut your acetate 1/2" wider on each side of your whole layer.


Next I scored my acetate at that 1/2" mark but when you do this don't score EXACTLY at 1/2".  Try to make it just a hair bigger on all sides to compensate for the thickness of your paper and sequins you might add.  

I found my card front was just a smidge too tight once I put it inside with the flaps closed so I shaved part of my card front off to accommodate.  This part can be a little finicky but it works out in the end.
Now cut your corners off indicated in the photo above so you have very nice flat flaps to adhere.  Add your favourite adhesive to your acetate so that when you fold the flaps closed it's attached to your card front layer as a whole piece, not the base of your card.
For my card images, as mentioned, I have used an image from the new Spellbinding Witches called "Ravella Witch" but also the recently released "Fang-tastic" matchables stamp and die set.  I thought the combination worked perfectly together!

The next step for your fully covered acetate shaker is to position your images where you would like them to be because ... see next photo:
...you will want to add some foam tape to pop up your acetate to give your sequins more room to float around in so this is what it looks like behind the scenes.  You can see that once I place my images back the foam tape will be covered.
Now you would cover your card front with the prepped acetate folding your flaps around to the back and adhering 3 out of 4 flaps.  Next, remove your foam backing and stick your acetate to the foam and then add your sequins from the last flap you've left open then adhere the 4th flap.  VOILA!  You now have your card front and as shown here I have already popped it onto a white layer and then the black card itself. 
Add your images using your favourite adhesive or more foam and you're done!  There are so many different ways of creating this.  You could actually have your scene inside the whole acetate cover if you choose but I still suggest popping your images up so you have room for your contents to float around.  I have seen some without using foam and if you choose this, just remember to score a bit bigger than your card front.


If you have any questions please leave a comment and I'll do my best to get back to you.  I hope you enjoyed this tutorial and give it a try!

Have a great day!


Tuesday, October 19, 2021

Colouring Tutorial with Polkadoodles Grab Your Broomstick

Today I'm sharing a Copic colouring video using the witch from "Grab Your Broomstick" stamp and die set.

To create my background, I've used Wilted Violet, Salvaged Patina and Peacock Feathers distress oxides.  After colouring this up I laid down the Trees/Foiliage Great Outdoors 6" x 6" stencil and coloured that in using black soot distress ink.  I love this stencil!


I used a couple of design papers from the Boneshakin Halloween Craft paper pad and layered up multiple pieces.  I die cut all the pieces using the die set from this collection and popped all of them up (except the pumpkin) using foam tape.  I added some grass and that cute Halloween fence to finish off!


COLOURING TUTORIAL


If you celebrate Halloween, do you partake in dressing up?  What was your favourite costume?  I was Raggedy Ann one year and even had the little pantaloon's she wore.  LOL!  It was fun!

Thanks for stopping by!
Eulanda


Friday, October 15, 2021

Polkadoodles Scary Boo

 Today I'm sharing a slimline card featuring Scary Boo Matchables from the Going Batty collection.


I started by colouring all my images using Copics and then die cut them using my Big Shot with the matching dies.  So easy and sooooo cute!


Next I created my main Halloween night scene by covering my layer with chipped sapphire distress oxide ink.  Then I laid down my Creepy Tree halloween stencil and coloured that up using black distress ink ... not the oxide but just the regular black ink.  I find it's a lot darker than the oxide's and I like how it made that creepy tree darker.  Then I distressed the edges with the same ink.  After doing that I added some splatters, which look a lot bigger in this pic than up above. 


I layered a few pieces of grass, popped on all my die cut images with some foam tape and added some googley eyes everywhere!!  LOL!  I even added a couple of bigger eyes to the bat and the "BOO" sentiment.  


For a bit of an extra touch I added a layer of purple glitter to finish off the card.  Are you a Halloween card maker?  I know some countries don't celebrate but they are fun!

Thanks for stopping by!

Friday, October 8, 2021

Polkadoodles Spellbinding Witches Collection

I'm back today with a card creation from the new Spellbinding Witches digital collection.

The image itself is called Isadora Witch and I've coloured her up using my copics.  She's available in pre-coloured light skin tones and pre-coloured deep skintones, which I think is so amazing and convenient when you don't feel like colouring.  I added some Stardust stickles to the crystal ball in her hand to make it pop a bit more.  Very pretty in real life.


The sentiment and extra pumpkins come from Grab Your Broomstick matchables set.  I love that this stamp set comes with a die set too.


My favourite thing I just LOVE about this card is the non-traditional colours.  I've used a few pieces from the Spooky Special paper pack but if you're too impatient to wait for shipping then the Boo Halloween printable paper could satisfy your non-traditional colour need as well.  LOL!  I think this is the first time I've ever made a Halloween card with these kinds of colours.  Christmas yes but not Halloween but it's so fun!!! 😀

How do you like using non-traditional colours for events or holidays?  Is it something you do often?

Thanks so much for stopping by!

Wednesday, September 29, 2021

Polkadoodles Hocus Pocus

Have you checked out the new stamp and die sets from the Scary Boo collection at Polkadoodles?  Today I have a little Halloween shaker card using the cute new stamp set "Hocus Pocus"!  👻


There really isn't much to this card as I just wanted to do something simpler to make the spooky mansion stand out so I focused that on top of a shaker card.  


I coloured this image using my copics and it's just so amazing just by itself that you don't really need anything else.  I added some bats for the sky scene and that fabulous sentiment that comes in the same set.  


The background paper is from the new Halloween "Batty Boo" paper pack available at your local retailers.  Are you like me who hoards her Halloween papers?  LOL!!

Thank you so much for stopping by!
Eulanda